Ciao tutti,
Ogni giovedi tocca a uno dei DT di Yumi Fumi da far vedere qualcosa ...
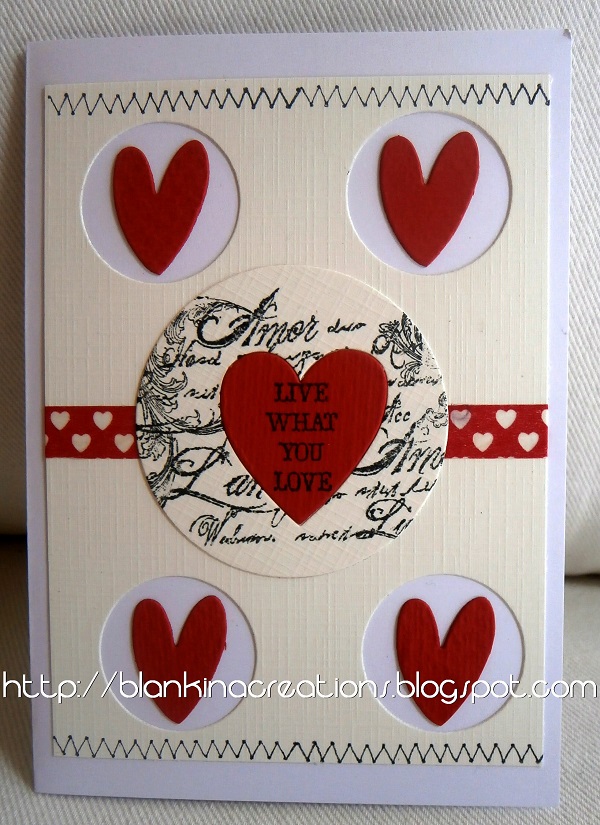
Vi piace il biglietto qui sopra ?? Vorresti farne uno ??
E' un tri shuttercard.
Molto divertente , ho visto diversi tutorials nel blogland e questo e il mio.
Hi all,
Each thursday on of the Yumi Fumi DT members will share a post with you.
Do you like the card above?? Would you like to make one??
It is a tri shuttercard.
It is fun to make, I have seen different tutorials in blogland and this is mine.
Hallo allemaal,
Elke donderdag word er door een Yumi Fumi DT lid een post gemaakt.
Vinden jullie de kaart hierboven leuk?? Willen jullie er ook een maken ??
Het is een tri shuttercard.
Leuk om te maken , ik heb verschillende tutorials in blogland gezien en dit is die van mij.
Avete bisogno del seguente :
cartoncino misura A 4 ( 29, 5 cm x 21 cm )
design papers
forbice
colla
riga
taglierino
score board ( ho usato il mio multi -pro di crafters companion )
timbri e carte , decorazioni a scelta
You will need the following:
cardstock of choice size A 4 ( 29, 5 cm x 21 cm )
design papers
scissors
glue
ruler
cutter
score board ( I have used my multi -pro from crafters companion )
stamps and decorations of choice
Je hebt het volgende nodig:
stevig papier maat A 4 ( 29, 5 cm x 21 cm )
design papers
schaar
lijm
lineaal
stanley mes
score board (ik heb mijn multi -pro van crafters companion gebruikt)
stempels, papier en decoraties naar keuze
fase 1:
Segni le misure sul foglio A 4
lato lungo a 5cm - 10 cm - 19,5 cm - 24, 5 cm
lato corto 4 cm - 11 cm
il pezzo sopra che remane viene tagliato con le forbice
step 1:
Out of the A4 cardstock you will have to sign
the long side at 5cm - 10 cm - 19,5 cm - 24, 5 cm
the short side at 4 cm - 11 cm
the remaining piece above has to be cut with scissors
stap 1:
Geef de volgende maten aan op het A4 vel
lange kant 5cm - 10 cm - 19,5 cm - 24, 5 cm
korte kant 4 cm - 11 cm
het bovenste deel wat over blijft word eraf geknipt
fase 2:
ti remane questo
tagli le linie rosse con il taglierino ( vedi fase 1 )
step 2:
this is what you get
now cut the red lines ( see step 1 )
step 2:
dit houd je over
snijd de rode lijnen ( zie stap 1 )
fase 3:
accenti le righe
pieghe giù e pieghe su
( vedi fase 1 )
step 3:
score the lines
up fold and down folds
( see step 1 )
stap 3:
score de lijnen
berg vouwen en dal vouwen
( zie stap 1 )
fase 4:
adesso il tuo biglietto dovrebbe essere così
step 4:
your card should look like this afterwards
stap 4:
zou moet je kaart er nu uit zien
fase 5:
pieghi le pieghe nel modo giusto
step 5:
bend the folds in the right way
stap 5:
vouw de vouwen in de juiste richting
fase 6:
tagli i pezzi di design papers per decorare il tri shuttercard
9, 5 cm x 6 cm = 2 pezzi
9 cm x 6 cm = 1 pezzo
9 cm x 3, 5 cm = 2 pezzi
4,5 cm x 3, 5 cm = 8 pezzi
( Ho usato due carte diverse , 4 pezzi di design paper e
4 pezzi di carta marmorisato che ho embossato )
step 6:
cut design paper pieces to embellish the tri shuttercard
9, 5 cm x 6 cm = 2 pieces
9 cm x 6 cm = 1 piece
9 cm x 3, 5 cm = 2 pieces
4,5 cm x 3, 5 cm = 8 pieces
( I have used two different papers, 4 pieces of design paper and
4 pieces of marbled papers which I have embossed )
stap 6:
knip de stukjes design papers voor de tri shuttercard
9, 5 cm x 6 cm = 2 maal
9 cm x 6 cm = 1 maal
9 cm x 3, 5 cm = 2 maal
4,5 cm x 3, 5 cm = 8 maal
( ik heb twee verschillende soorten papier gebruikt ,
4 maal design paper en
4 maal papier wat ik heb geembost )
fase 7:
incolla la carta in questo modo sul tri shuttercard
step 7:
glue it onto the tri shuttercard like this
stap 7:
lijm het papier op deze wijze op de tri shuttercard
fase 8:
Ho decorato il tri shuttercard con timbri di Yumi Fumi
nastro, fustellate e strass
Che ne dite ??
step 8:
I have embellished the tri shuttercard with Yumi Fumi stamps
and some dies and ribbon
What do you think??
stap 8:
Ik heb mijn tri shuttercard gedecoreerd met Yumi Fumi stempels
wat stanzen en lint en strass
Wat vinden jullie ervan ??
Una volta chiusa entra in una busta normale C 6
the closed tri shuttercard fits into a normal C 6 envelope
Een maal gesloten past hij mooi in een gewone envelop maat C6
Spero che vi è piaciuto il mio tutorial, è tutto chiaro ?
Se avete domande o commenti da fare lasciate un commento qui sotto..
Non vedo l'ora di vedere i vostri tri shutter cards!
Hope you have enjoyed my little tutorial, is it all clear to you?
If you have questions or comments do not hesitate to leave a message below..
Cannot wait to see your cards!
Hopenlijk vonden jullie mijn tutorial leuk , is alles duidelijk?
Laat een commentaar achter met jullie vragen of opmerkingen ..
Nu wacht ik jullie mooie kaarten af !
my receipe:
stamp Yumi Fumi (
here ) ,swirls stamp Kaisercraft, floral stamp Marianne Design
sentiment stamp The Greeting Farm, hexagon die Nellie Snellen, butterfly die Sissix
design papers Marianne Design, foliart cardstock , embossingfolder, ribbon, strass, copics
Challenges:
Love rubberstamps - your favoutite colour combo ( pink and red )
Dutch Card Lovers - anything goes
PTT - anything goes
THANKS!
Hugs Blankina